A captivating scene played out in the media area as qualifying for the British Grand Prix approached its conclusion. After completing his media commitments, Q2 casualty Isack Hadjar remained to observe the final stages of a gripping battle for pole position.
Oscar Piastri held the top spot following his final attempt, having initially set the fastest time in his first Q3 run, but was unable to improve upon his initial effort after running wide at Club. Lando Norris made gains but couldn’t surpass his teammate – however, Hadjar’s focus wasn’t on the McLarens – his attention was solely on Lewis Hamilton’s final push.
A figure Hadjar idolized during his early years, Hamilton had stormed to a then-best first sector time and appeared poised for an impressive outcome, but ran wide at Club, losing considerable time. The possibility of a surprise pole position vanished, and Hadjar appeared visibly disappointed when the Ferrari driver crossed the finish line a tenth of a second short, and departed.
Hadjar then missed his Red Bull teammate Max Verstappen conjuring up a remarkable lap behind the wheel of his RB21. After mentioning that it was challenging to control following the opening run, in which he trailed Piastri’s benchmark time by over a quarter of a second, Verstappen seemingly tamed his unruly machine and delivered a pair of exceptional opening sectors – though he shed some time in the final sector, making the difference appear marginally smaller.
How did Verstappen extract the additional pace? Did Piastri possess any remaining performance on his final lap? Did Hamilton’s error genuinely jeopardize a chance at pole? Let’s analyze the data, starting with the best laps of Verstappen and Piastri.
Sector 1: Disparity in Red Bull and McLaren configurations, 0.122s Verstappen edge
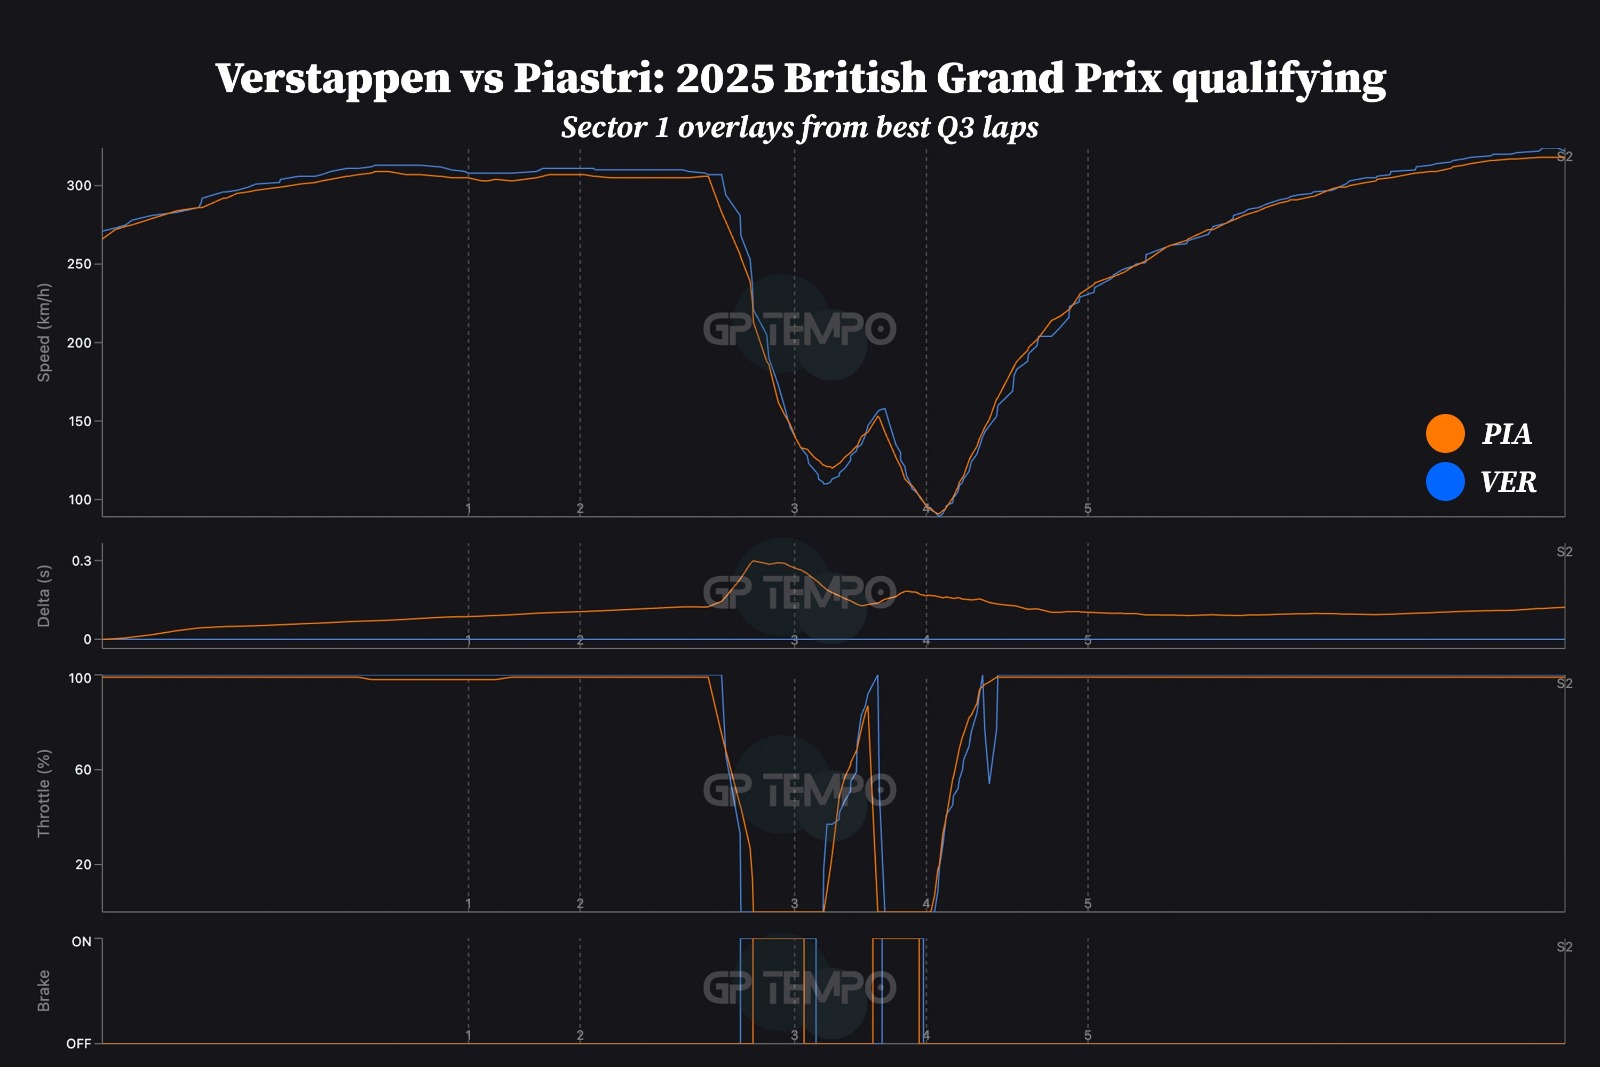
The Red Bull’s superior straightline speed can be seen in the opening sector
Both Red Bull and McLaren opted for contrasting strategies regarding maximum aerodynamic downforce for the British Grand Prix weekend; Red Bull reduced its rear wing angle to achieve greater straight-line speed, while McLaren increased the downforce to enhance performance in the medium and low-speed corners.
The effect of this decision is immediately apparent when comparing Verstappen’s final Q3 lap with Piastri’s quickest lap of the final qualifying session. Verstappen gains a 0.12s advantage simply due to increased speed through Turns 1 and 2. According to the delta chart, Verstappen’s lead grows through the corner, but diminishes again, likely due to the differing lines taken through Turns 3, 4, and 5. Piastri carries more minimum speed and has better traction exiting the Loop, recovering approximately 0.03s.
However, Verstappen’s straight-line speed advantage began to increase once more along the Wellington Straight. At roughly 240km/h, Verstappen’s acceleration allows him to move faster than Piastri on the run to Brooklands.
McLaren prioritized stability, which is reflected in the throttle traces. Piastri can apply the throttle earlier and generate initial traction out of the corners, whereas Verstappen had to briefly lift off the throttle exiting the Loop to stabilize the rear end. While this didn’t significantly impact his time, it highlights the delicate balance the Dutchman had to maintain.
Sector 2: Verstappen extends his lead

Verstappen continued to build his advantage in the middle segment of the lap
Verstappen’s setup was less suitable for a strong run through Brooklands and Luffield. He carried approximately 10km/h less through the Brooklands left-hander and had to apply roughly 10% throttle to maintain speed and stabilize the rear. He then briefly applied full throttle before lifting on the Luffield transition, but had to brake for longer to maintain control before exiting the corner for Woodcote.
Thanks to the McLaren’s greater rear downforce, Piastri accelerated more quickly out of Luffield and even held a 0.015s advantage over Verstappen at this stage – but Copse would soon change this significantly. Verstappen was once again faster at the end of the straight and even lifted slightly through the corner. However, this didn’t cost him anything; in fact, the delta continued to increase in Verstappen’s favor as he carried between 8-9km/h more through Maggotts and Becketts.
The variations in throttle traces and braking are also noteworthy here. Piastri lifts off the throttle less through Maggotts and brakes earlier – but less forcefully – for Becketts before transitioning to the Hangar Straight. Verstappen only begins braking when Piastri has finished his brief touch of the pedal, braking into the corner to maintain stability through the final phase.
Piastri trails Verstappen by 0.313s at the apex of Becketts, although the traction out of it reduces the gap to “only” 0.262s.
Sector 3: Verstappen concedes the final sector but secures pole

Superior traction helps Piastri narrow the final gap to Verstappen
Piastri’s deficit increases again to 0.315s as Verstappen approaches the end of Hangar and enters Stowe; the Red Bull driver also appears more inclined to brake later to prolong the DRS usage. However, he is required to brake for a longer duration, while Piastri applied the throttle sooner (though Verstappen reaches 100% throttle sooner on the exit), contributing to a smaller 0.24s delta here.
Verstappen reduces that gap with a later braking point into Vale/Club, but Piastri’s superior traction to the end of the lap enables him to overtake the four-time champion in this section. This is the primary factor contributing to the gap decreasing to 0.103s at the finish line, as Verstappen simply navigates the final corners at a slower pace.
Nevertheless, it wasn’t sufficient to deter Verstappen, who had already established a significant advantage in the earlier parts of the lap.
Piastri’s late lap error: what was the impact?

McLaren driver had been on course to improve before late wobble on final run
On his final Q3 lap (white), Piastri was actually faster than his previous run (by approximately 0.01s) before losing time through Stowe due to braking for a longer duration. His braking point was identical at that point, but he had also lifted off the throttle sooner in the meantime, and the combination of these marginally different inputs resulted in a lap-on-lap difference of 0.06s by that point.
Piastri then adopted a faster approach into Vale and Club, attempting to carry more speed through a section of the circuit where he was strong. The GPS delta also suggests he used a slightly wider line in an attempt to open up the corner.
His McLaren then ran wide through Club, causing him to lift off the throttle by 30%. Given that Piastri was only 0.03s off his best time prior to this point, it suggests that the final margin would have been close between his two laps, although his delta had been decreasing.
Regardless, even if Club had been executed perfectly and the delta had continued to decrease rather than increase due to the slide, Piastri wouldn’t have found the time required to negate Verstappen’s later lap. The damage had already been inflicted in Stowe.
Hamilton’s pole attempt falls short at Vale?
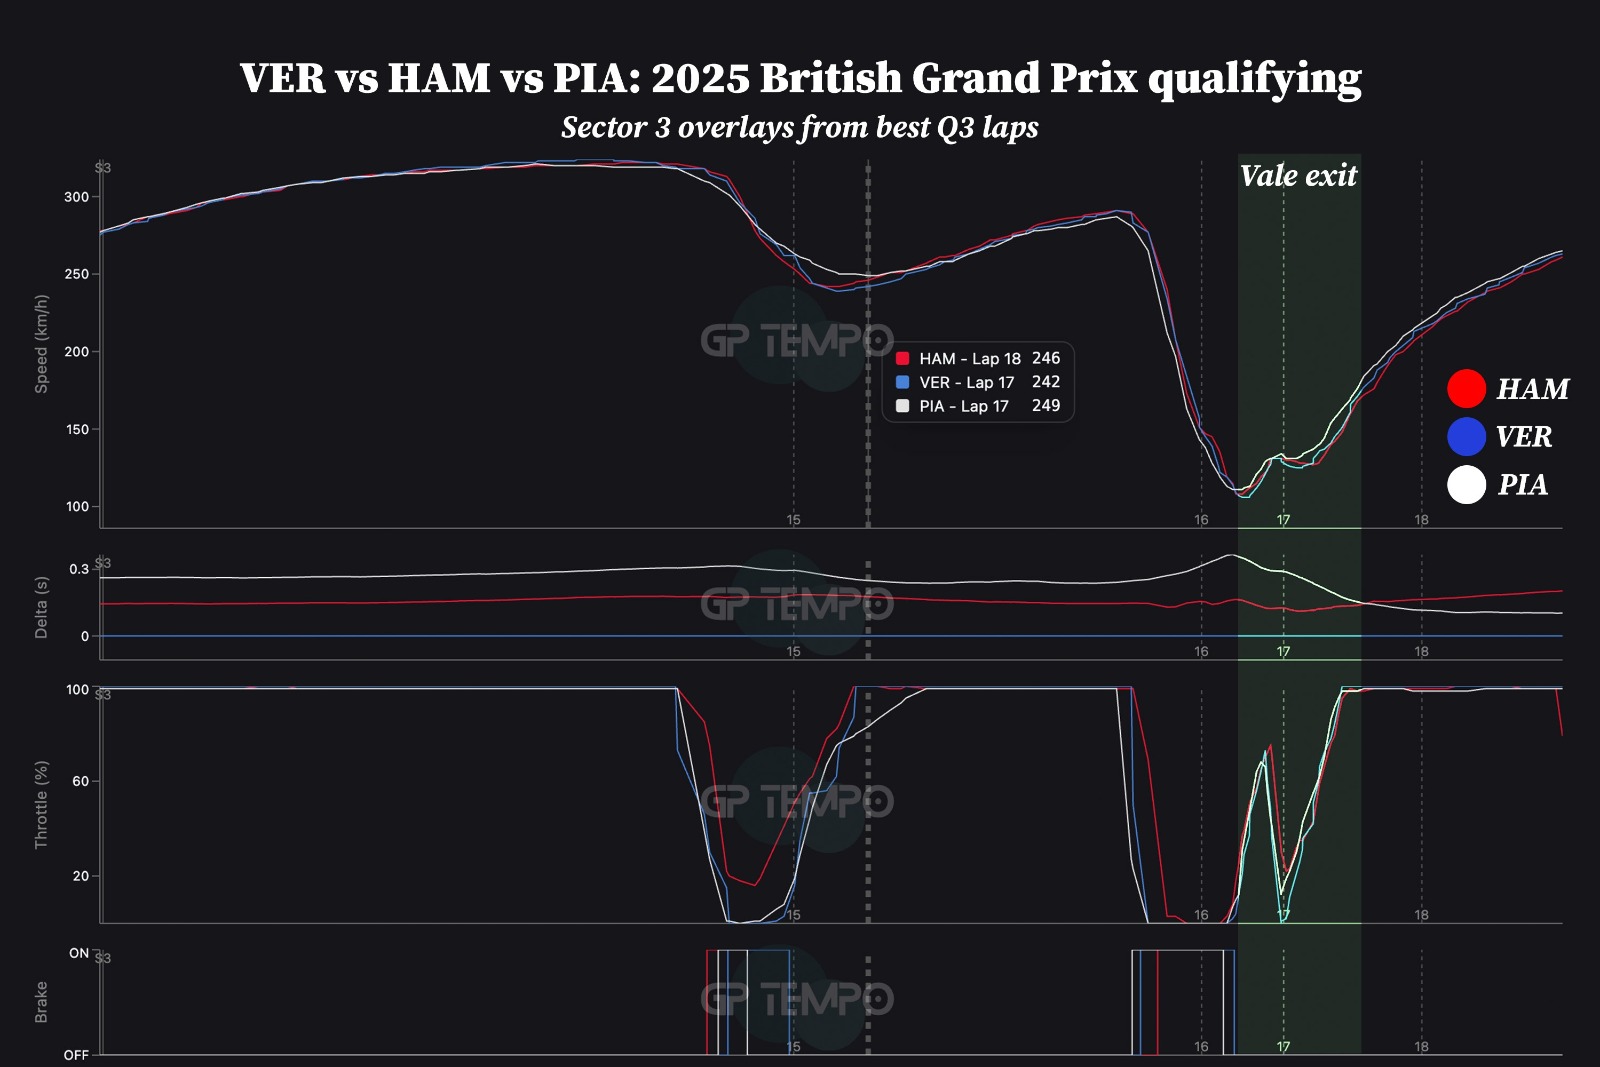
Ferrari driver Hamilton could’ve been right in the mix without his slight final-corner woes
After Hamilton recorded his opening sector, it appeared that the Briton might launch a surprise bid for pole position; in reality, Ferrari lacked the straight-line speed necessary to challenge the Red Bulls; Copse, and Maggotts/Becketts contributed the most to the nine-time British GP winner’s deficit.
But his assertion that his minor slip at Vale “probably cost me second” on the grid was largely accurate; he lost time by perhaps over-manipulating the throttle on the entry to the corner, losing momentum here.
That being said, Piastri’s initial approach to Club on his final tour was impressive; although Hamilton felt he’d lost a tenth with his minor mistake, this would merely put him on par with Piastri overall. As has been reiterated countless times this year, the margins are incredibly small…